

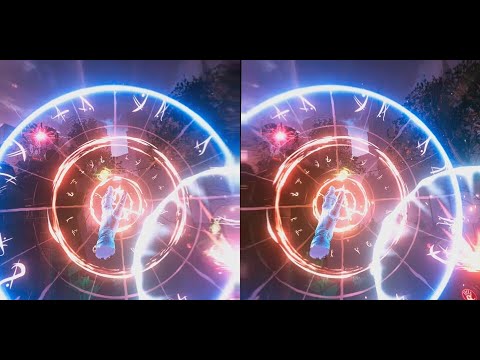
The Quest 3 and Quest 2 can now record 3D videos and photos. You can use this for 3D screen recordings of your games or use the Quest 3 as a 3D camera. Here’s how to do it, step by step. First, here’s a sample 3D video recording (I recommend watching on YouTube VR):
How to enable 3D recording on Quest 2 or Quest 3
The easiest way to enable 3D recording is with Quest Games Optimizer. Otherwise, here’s how. If you already have Sidequest (advanced installation) or ADB then skip ahead to Step 3. Otherwise, start from Step 1.
Step 1: enable Developer mode
Create a developer account on Meta (it’s free and takes just a few clicks). Make sure you log in with the same account as the one you use for your Quest.
On the Meta Quest app on your phone, enable Developer mode:
- tap on Menu on bottom right.
- tap on Devices.
- tap on your headset.
- tap on Headset Settings. (If it is grayed out, wear your headset to take it out of standby mode.)
- tap on Developer Mode and then toggle Debug mode.
Step 2: install ADB (Android Debug Bridge) on your PC
There are two ways to install ADB.
Option 1: Install Sidequest (advanced installer), which includes ADB. Sidequest is a very useful utility for finding App Lab games as well as games and apps that aren’t on the official Meta store. Note: Sidequest is not illegal and it won’t void your warranty.
Option 2: Install ADB for Oculus. If you don’t want to use Sidequest, you can just install ADB by itself, but you need to know how to use the command prompt in Windows.
Step 3: connect your Quest to your PC
Connect your Quest 3 to your PC with a USB cable. Wear your Quest and authorize the ADB connection. (You can choose “Always Allow.”)
Step 4: run these ADB commands
The final step is to run a set of ADB commands to enable 3D recording. On Sidequest, you can enter ADB commands by clicking on the rightmost Custom Command icon on the upper right corner (it looks like an exit icon, but it’s actually the custom command icon). If you used ADB by itself, then launch Windows command prompt, go to the directory where you installed ADB and from there, you can run the commands:
adb shell setprop debug.oculus.screenCaptureEye 2
adb shell setprop debug.oculus.capture.width 1920
adb shell setprop debug.oculus.height 1920
adb shell setprop debug.oculus.fullRateCapture 0
adb shell setprop debug.oculus.capture.bitrate 40000000
adb disconnect
Note: if you are using Windows Powershell, then each command must be preceded by “.\” such as:
.\adb shell setprop debug.oculus.screenCaptureEye 2
Rinse and repeat
Unfortunately, the switch to 3D capture isn’t permanent. Every time you turn off the Quest 3, you’ll have to do Step 4 again.
How to use Quest 3’s 3D Camera
Once you’ve followed the instructions above and enabled 3D capture, then you can record 3D photos and videos the same way that you capture a video on Quest, using the Camera icon on the Quest menu. After recording, you’ll see that the video or photo will be captured in side by side format, with a square aspect ratio. Photos will also be side by side but they are stretched vertically, and need to be edited to fix that.
In addition, you can also use the Quest 3’s color passthrough cameras to turn it into a 3D camera. To use the Quest 3 as a 3D camera, simply enable passthrough mode, then take a video or photo. Can you take photos or videos in the sun? Yes, as long as you don’t allow the sun to enter the rear lenses.
How to watch 3D videos and 3D photos
For 3D photos, you can upload the photo to Orbix360 or Immergallery. Both support 3D side by side photos. Photos are in the Quest folder Oculus\screenshots.
There are several options for watching 3D videos. The first way is to view the file in DeoVR (3D videos) or other apps on the Quest that allow viewing of 3D SBS (side-by-side) videos. The video is in the folder Oculus\videoshots.
You can also upload the video to YouTube. If you do, the video will be uploaded as a non-3D side-by-side video, which can be viewed in 3D using the Quest browser. Check out this post. If you want the video to be viewable in 3D in the YouTube VR app, you’ll need to add 3D metadata before uploading to YouTube.
To add 3D metadata, download ffmpeg essentials. Copy ffmpeg.exe to the folder where your video is stored, then launch a command prompt (shift + right click, then choose command prompt or powershell). Then type this command:
ffmpeg -i input_filename.mp4 -vcodec libx264 -x264opts "frame-packing=3" -vf setdar=1 output_filename.mp4
(Just replace input_filename.mp4 with the name of the file and the output_filename.mp4 with the name of the new file.) If you use powershell, then you’ll have to add a .\ at the beginning:
.\ffmpeg -i input_filename.mp4 -vcodec libx264 -x264opts "frame-packing=3" -vf setdar=1 output_filename.mp4
Conclusion
It’s very hard to explain how awesome VR is unless you’ve actually experienced it. YouTube videos of gameplay simply can’t capture the feeling of being in a VR game. with this feature, we’re at least a step closer, enabling people to see gameplay in 3D. I wish the process was as easy as simply toggling an option in the menu, instead of having to go through ADB, and that the videos would already have the 3D metadata for YouTube and Facebook, making it easier to share the video with their friends. I also wish that Quest would have the ability to capture not just 3D videos and photos, but 3D 360 videos and photos, or at least VR180. Until then, this is the next best thing.


Add Comment